Material Design Tab Layout in Android
Material Design Tab Layout in Android
In this tutorial, we will learn about how to create a Tab Layout in Android App.
For Tab Layout with Child Tab Layout see here

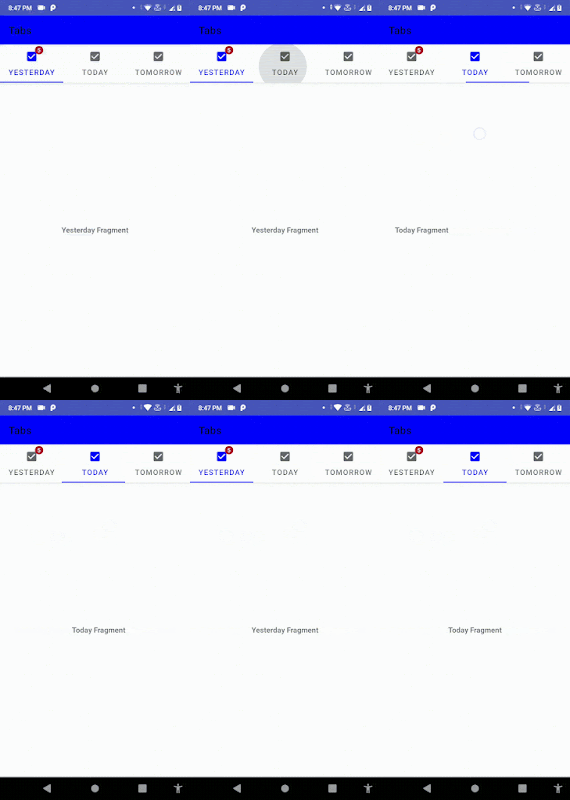
Material Design tab layout in Android App
Use Material design library in app-level build.gradle implementation 'com.google.android.material:material:1.5.0'
style.xml (App theme) <style name="AppTheme" parent="Theme.MaterialComponents.Light.DarkActionBar">
<!-- Customize your theme here. -->
<item name="colorPrimary">@color/colorPrimary</item>
<item name="colorPrimaryDark">@color/colorPrimaryDark</item>
<item name="colorAccent">@color/colorAccent</item>
</style>
After that, Create Tab layout and a View pager in your Main Activity where you want to control all tab fragments.
- Create an Activity where you will control all your fragments data.
- Create tab layout and view pager in that activity
- Create some fragments to show in Tab Layout. We will create 3 fragments.
- Add that fragments to Tab Layout.
In our code all fragments code are same, so we will place only one fragment code, you can add your own code according to your need.
fragment.xml <?xml version="1.0" encoding="utf-8"?>
<FrameLayout xmlns:android="http://schemas.android.com/apk/res/android"
xmlns:app="http://schemas.android.com/apk/res-auto"
xmlns:tools="http://schemas.android.com/tools"
android:layout_width="match_parent"
android:layout_height="match_parent"
android:orientation="vertical">
<TextView
android:layout_width="wrap_content"
android:layout_height="wrap_content"
android:gravity="center"
android:layout_gravity="center"
android:text="Yesterday Fragment"
android:textStyle="bold" />
</FrameLayout>
Fragment class public class Yesterday_fragment extends Fragment {
public Yesterday_fragment() {
// Required empty public constructor
}
@Override
public View onCreateView(LayoutInflater inflater, ViewGroup container,
Bundle savedInstanceState) {
// Inflate the layout for this fragment
return inflater.inflate(R.layout.fragment_yesterday_fragment, container, false);
}
}
xml activity <?xml version="1.0" encoding="utf-8"?>
<LinearLayout xmlns:android="http://schemas.android.com/apk/res/android"
xmlns:app="http://schemas.android.com/apk/res-auto"
xmlns:tools="http://schemas.android.com/tools"
android:layout_width="match_parent"
android:layout_height="match_parent"
android:orientation="vertical"
tools:context=".MaterialDesign.Tabs_Layout">
<com.google.android.material.appbar.AppBarLayout
android:layout_width="match_parent"
android:layout_height="wrap_content">
<com.google.android.material.appbar.MaterialToolbar
android:layout_width="match_parent"
android:layout_height="wrap_content"
app:title="Tabs"/>
<com.google.android.material.tabs.TabLayout
android:id="@+id/tabs_layout"
app:tabMode="scrollable"
android:layout_width="match_parent"
android:layout_height="wrap_content"/>
</com.google.android.material.appbar.AppBarLayout>
<androidx.viewpager.widget.ViewPager
android:id="@+id/view_pager"
android:layout_width="match_parent"
android:layout_height="match_parent"
app:layout_behavior="com.google.android.material.appbar.AppBarLayout$ScrollingViewBehavior"/>
</LinearLayout>
Then We will add the fragments to tab layout in our activity class.
activity.java public class Tabs_Layout extends AppCompatActivity {
TabLayout tabLayout;
ViewPager view_pager;
Yesterday_fragment yesterday_fragment;
Today_fragment today_fragment;
Tomorrow_Fragment tomorrow_fragment;
@Override
protected void onCreate(Bundle savedInstanceState) {
super.onCreate(savedInstanceState);
setContentView(R.layout.activity_tabs__layout);
tabLayout = findViewById(R.id.tabs_layout);
view_pager = findViewById(R.id.view_pager);
yesterday_fragment = new Yesterday_fragment();
today_fragment = new Today_fragment();
tomorrow_fragment = new Tomorrow_Fragment();
tabLayout.setupWithViewPager(view_pager);
ViewPagerAdapter adapter = new ViewPagerAdapter(getSupportFragmentManager(),0);
adapter.addfragment(yesterday_fragment,"Yesterday");
adapter.addfragment(today_fragment,"Today");
adapter.addfragment(tomorrow_fragment,"Tomorrow");
view_pager.setAdapter(adapter);
view_pager.setOffscreenPageLimit(3); //how much fragments loaded all time, no need to reload everytime we scroll
//here our tab layout now ready
//next we can change some layout and some icons and badges to our tablayout
//icons to different tab layouts
//with only icons also set text to show text also with icons
tabLayout.getTabAt(0).setIcon(R.drawable.check_box_tick_20).setText("Yesterday");
tabLayout.getTabAt(1).setIcon(R.drawable.check_box_tick_20).setText("Today");
tabLayout.getTabAt(2).setIcon(R.drawable.check_box_tick_20).setText("Tomorrow");
//badges on tab layout titles
BadgeDrawable drawable = tabLayout.getTabAt(0).getOrCreateBadge();
drawable.setVisible(true);
drawable.setNumber(5);
}
public class ViewPagerAdapter extends FragmentPagerAdapter
{
private List<Fragment> fragments = new ArrayList<>();
private List<String> fragmentTitles = new ArrayList<>();
public ViewPagerAdapter(@NonNull FragmentManager fm, int behavior) {
super(fm, behavior);
}
public void addfragment(Fragment fragment , String title)
{
fragments.add(fragment);
fragmentTitles.add(title);
}
@NonNull
@Override
public Fragment getItem(int position) {
return fragments.get(position);
}
@Override
public int getCount() {
return fragments.size();
}
}
}
Now, our Tab layout is ready to see..
For Tab Layout with Child Tab Layout see here
Follow us for more posts like this, In this tutorial, we will learn about how to create a Tab Layout in Android App.
For Tab Layout with Child Tab Layout see here
 |
| Material Design tab layout in Android App |
Use Material design library in app-level build.gradle
implementation 'com.google.android.material:material:1.5.0'
style.xml (App theme)
 <style name="AppTheme" parent="Theme.MaterialComponents.Light.DarkActionBar">
     <!-- Customize your theme here. -->
     <item name="colorPrimary">@color/colorPrimary</item>
     <item name="colorPrimaryDark">@color/colorPrimaryDark</item>
     <item name="colorAccent">@color/colorAccent</item>
   </style>
After that, Create Tab layout and a View pager in your Main Activity where you want to control all tab fragments.
- Create an Activity where you will control all your fragments data.
- Create tab layout and view pager in that activity
- Create some fragments to show in Tab Layout. We will create 3 fragments.
- Add that fragments to Tab Layout.
In our code all fragments code are same, so we will place only one fragment code, you can add your own code according to your need.
fragment.xml
 <?xml version="1.0" encoding="utf-8"?>
 <FrameLayout xmlns:android="http://schemas.android.com/apk/res/android"
   xmlns:app="http://schemas.android.com/apk/res-auto"
   xmlns:tools="http://schemas.android.com/tools"
   android:layout_width="match_parent"
   android:layout_height="match_parent"
   android:orientation="vertical">
   <TextView
     android:layout_width="wrap_content"
     android:layout_height="wrap_content"
     android:gravity="center"
     android:layout_gravity="center"
     android:text="Yesterday Fragment"
     android:textStyle="bold" />
 </FrameLayout>
Fragment class
 public class Yesterday_fragment extends Fragment {
   public Yesterday_fragment() {
     // Required empty public constructor
   }
   @Override
   public View onCreateView(LayoutInflater inflater, ViewGroup container,
                Bundle savedInstanceState) {
     // Inflate the layout for this fragment
     return inflater.inflate(R.layout.fragment_yesterday_fragment, container, false);
   }
 }
xml activity
 <?xml version="1.0" encoding="utf-8"?>
 <LinearLayout xmlns:android="http://schemas.android.com/apk/res/android"
   xmlns:app="http://schemas.android.com/apk/res-auto"
   xmlns:tools="http://schemas.android.com/tools"
   android:layout_width="match_parent"
   android:layout_height="match_parent"
   android:orientation="vertical"
   tools:context=".MaterialDesign.Tabs_Layout">
   <com.google.android.material.appbar.AppBarLayout
     android:layout_width="match_parent"
     android:layout_height="wrap_content">
     <com.google.android.material.appbar.MaterialToolbar
       android:layout_width="match_parent"
       android:layout_height="wrap_content"
       app:title="Tabs"/>
     <com.google.android.material.tabs.TabLayout
       android:id="@+id/tabs_layout"
       app:tabMode="scrollable"
       android:layout_width="match_parent"
       android:layout_height="wrap_content"/>
   </com.google.android.material.appbar.AppBarLayout>
   <androidx.viewpager.widget.ViewPager
     android:id="@+id/view_pager"
     android:layout_width="match_parent"
     android:layout_height="match_parent"
     app:layout_behavior="com.google.android.material.appbar.AppBarLayout$ScrollingViewBehavior"/>
 </LinearLayout>
Then We will add the fragments to tab layout in our activity class.
activity.java
 public class Tabs_Layout extends AppCompatActivity {
   TabLayout tabLayout;
   ViewPager view_pager;
   Yesterday_fragment yesterday_fragment;
   Today_fragment today_fragment;
   Tomorrow_Fragment tomorrow_fragment;
   @Override
   protected void onCreate(Bundle savedInstanceState) {
     super.onCreate(savedInstanceState);
     setContentView(R.layout.activity_tabs__layout);
     tabLayout = findViewById(R.id.tabs_layout);
     view_pager = findViewById(R.id.view_pager);
     yesterday_fragment = new Yesterday_fragment();
     today_fragment = new Today_fragment();
     tomorrow_fragment = new Tomorrow_Fragment();
     tabLayout.setupWithViewPager(view_pager);
     ViewPagerAdapter adapter = new ViewPagerAdapter(getSupportFragmentManager(),0);
     adapter.addfragment(yesterday_fragment,"Yesterday");
     adapter.addfragment(today_fragment,"Today");
     adapter.addfragment(tomorrow_fragment,"Tomorrow");
     view_pager.setAdapter(adapter);
     view_pager.setOffscreenPageLimit(3); //how much fragments loaded all time, no need to reload everytime we scroll
     //here our tab layout now ready
     //next we can change some layout and some icons and badges to our tablayout
     //icons to different tab layouts
     //with only icons also set text to show text also with icons
     tabLayout.getTabAt(0).setIcon(R.drawable.check_box_tick_20).setText("Yesterday");
     tabLayout.getTabAt(1).setIcon(R.drawable.check_box_tick_20).setText("Today");
     tabLayout.getTabAt(2).setIcon(R.drawable.check_box_tick_20).setText("Tomorrow");
     //badges on tab layout titles
     BadgeDrawable drawable = tabLayout.getTabAt(0).getOrCreateBadge();
     drawable.setVisible(true);
     drawable.setNumber(5);
   }
   public class ViewPagerAdapter extends FragmentPagerAdapter
   {
     private List<Fragment> fragments = new ArrayList<>();
     private List<String> fragmentTitles = new ArrayList<>();
     public ViewPagerAdapter(@NonNull FragmentManager fm, int behavior) {
       super(fm, behavior);
     }
     public void addfragment(Fragment fragment , String title)
     {
       fragments.add(fragment);
       fragmentTitles.add(title);
     }
     @NonNull
     @Override
     public Fragment getItem(int position) {
       return fragments.get(position);
     }
     @Override
     public int getCount() {
       return fragments.size();
     }
   }
 }
Now, our Tab layout is ready to see..
For Tab Layout with Child Tab Layout see here
Subscribe to Harpreet studio on Youtube
Like Harpreet Studio on Facebook
Follow me on Instagram
Install our Android app from Google Play store


No comments